I finally decided to make a workbench for tools like my router table, drill press, and bench top sanders.
I had been needing to do this for several months now, but just couldn’t decide exactly what I wanted. I wanted to make sure that this workbench was everything I currently needed and have some room to grow and be modified as my needs changed. That is when I came up with this design.

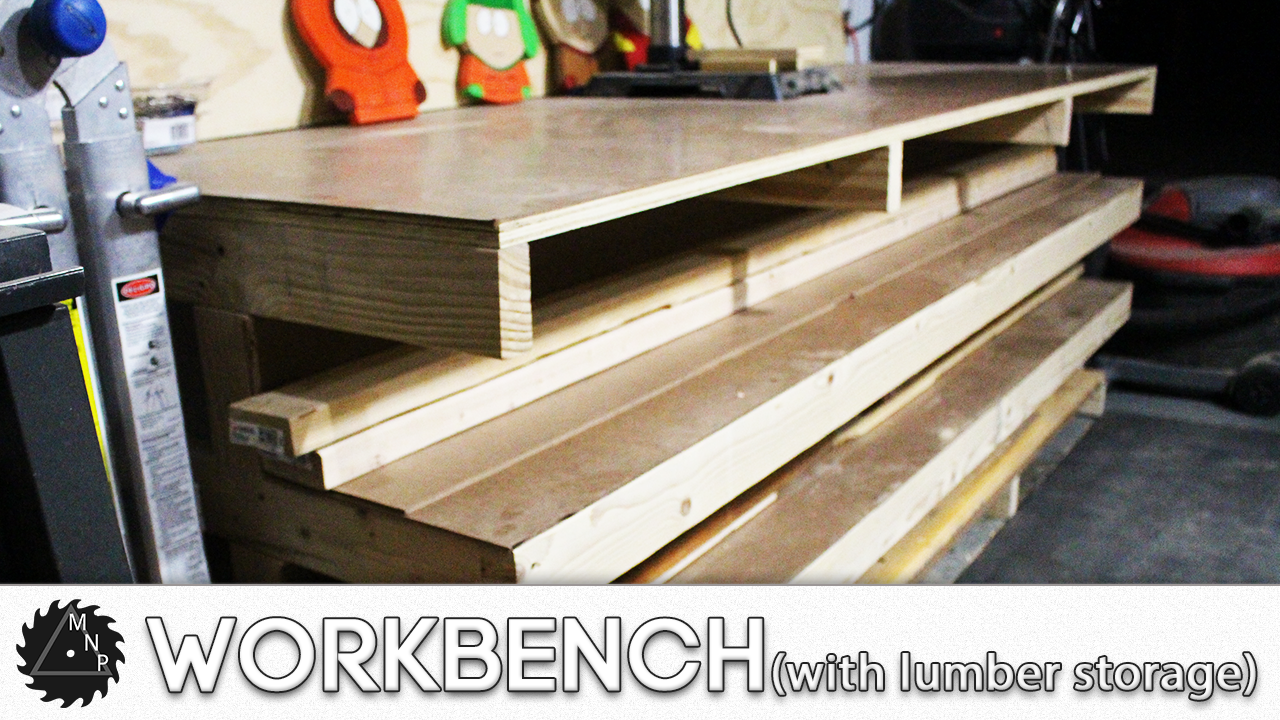
There was 2 things I needed in this workbench.
1 strong and sturdy to hold heavy tools
2 lumber storage LUMBER STORAGE LUMBER STORAGE

Why do I need the lumber storage, because the shop I work in is very small. I am using my 2 car garage to do all my work. The ceilings are right at 8 foot tall, so putting storage high on the wall really isn’t an option. But this guy is.
The first thing I did was cut all my lumber. Make sure you check out the cut list to see all the materials for this project.
To save lumber here is how I cut each of the 14 (2x4s) boards.
4 – 8” long so didn’t cut
12 – 31-1/2” (I cut all 12 out of 4 boards, 3 of these per board)
Those 2 were easy, because I could use pretty much the entire length of the 2x4 to get those boards. These next 3 were more complicated, but I think I can explain it here:
I needed 4 – 33” boards and 8 – 33-1/2” boards. No matter how you add it up you cannot get 3 of those out of a standard 2x4
So here is what you do, you cut 2 of each of those sizes out of each of the remaining 6 (2x4s). But save the cut offs because you will make the spacers out of those. And as it turns out, you will be able to get 4 spacers out of the cutoffs and that will mean you have virtually no waste from the 2x4s.
Once you get all your lumber cut, you are ready to start assembling. You will start with one of the ends.


You will need to assemble 2 of these with the hang off points going to the left, then 2 more the exact same way, except the hang offs will go to the right. I explain this in the video as well.
Once you have all 4 of these assembled you are ready to start putting this workbench together.
One thing to note here, the 2x4s I purchased were not exactly 3-1/2” wide. So the last spacer I put up had to be trimmed about an 1/8”. I had to trim all 4 sections. Was not a big deal.

I started by attaching my 2x4s to the outside 2 frames and then going back and adding the 2 middle ones.

When I added the 2 middle ones I used a spacer to make sure I offset them the same amount in the front and back, and the left and right side.

This project is actually pretty easy. Once you cut the boards it is just assembling the workbench.
Once you get to this point you are ready to cut the plywood to fit the top. Once the top is cut to fit you are finished. Unless you decide to go back and had hardy board to the top to project the plywood from scratches and cuts and what not.
Be sure to check out the video if you haven’t already. I also have the sketup file available for you to download and modify to your needs.
Subscribe on YouTube: https://www.youtube.com/user/StudioEp...
Follow me Twitter: https://twitter.com/MyNextProjects
Follow me Instagram: https://www.instagram.com/mynextproje...
